Showing posts with label Castles. Show all posts

Friday, October 19, 2012

NIGHT RIDER - Fiction from High School and a Cool 3D Drawing of Skull Castle!

Holmes Basic Sample Dungeon Cross Section
I was poking around in the attic the other day and finally found my two copies of Gallery Magazine that I worked on as the Science Fiction Editor back in high school.  I wrote two science fiction/fantasy stories for the magazine during that time but distinctly remember writing the second piece as a junior in 1983 because in essence, it was my first ever written recap of D&D play, and also my first attempt at fiction writing.  Rather than just writing it from a blank piece of paper which I have always had a hard time doing, I wrote up an AD&D adventure centered around a wizard's keep called Skull Castle and the story itself is called "A Visit to Skull Castle".  So where did I get the idea for skull castle you might ask?  The Holmes Basic D&D sample dungeon cross section for Skull Mountain of course!  For the second story, I ran a friend of mine through the adventure that I wrote during study hall - yeah, we weren't studying real hard, but it was for the school magazine after all!  I took notes during play about what happened and afterwards, I wrote up a recap of the adventure as a basis for the second magazine story.


I totally forgot about the fact that I had done this little prequel story first while in 10th grade in the 1982 edition of Gallery Magazine, and that it included a very cool 3D view of the castle that I drew up and inked for the story!  I was just learning drafting at the time (I took a drafting class in 9th grade in high school and eventually got a degree in architecture) but had drawn up many a dungeon plan prior to drawing this.  In fact, if it wasn't for D&D I probably would have never become an architect in the first place.  The castle drawing actually looks like a perspective but may have been an isometric type of drawing though if so, it's it doesn't look like its in the usual 30/60 degree angle format (but it may be).  I'll have to slap this sucker on the old drafting board and see if it really is a true perspective or an isometric drawing.  Either way, it's a precursor to some of the cool castle drawings I did for Iron Crown Enterprises back in the day, a few of which were 3D perspectives or isometric/axonometric projections like this one.  It also illustrates my fanaticism and intense interest in castle design and construction and castle drawing which was a direct result of playing D&D as a kid.

I had a book when I was a kid (though I'm not sure where it is now) simply entitled Castle by David MacAulay (see Amazon link here:  Castle by David MacAulay) which describes how the Norman Conquerors built their castles to control Wales after their conquest of England in 1066.  The book is wonderfully illustrated and includes plans, perspectives and illustrations of a fictitious castle supposedly built in Wales following the Norman Conquest.  The drawings are very detailed and take you from design through construction, and even illustrate a siege of the castle at the end by an opposing army.  This is where I learned the most about how actual historical castles were really built, and the book is highly recommended reading for anyone who has an interest in this topic, especially gamers and military history buffs.  I went on to earn a minor degree in Architectural History from UVA along with a Bachelor of Science in Architectural Design, and wrote my minor thesis on, you guessed it, the Evolution of the Tower Keep in Medieval England.  That's up in the attic too and maybe someday I'll scan that in to post here as well.

In the meantime, enjoy my first foray into fiction writing and an early 3D castle drawing in the story below.  I'll post the recap of the actual adventure from the 1983 publication of Gallery Magazine as a followup to this blog post.  I'll see if I can find the original plan layout for this castle and the dungeon write up to post here as well, but my guess is I've lost it at this point.  There's nothing to keep me from re-creating the castle plan and D&D adventure write up from the recap and the drawing below though!


Copyright notice:  All original artwork and works of fiction on this page are copyrighted by the original writer and artist, Daniel Cruger.  This story and artwork may be downloaded and used for personal use only and may not be reproduced for commercial purposes in any way without the express written consent of the owner.


Thursday, September 27, 2012

Averlorn Campaign: Dungeon Module B2 The Keep on the Borderlands


Recap from 11/4/2011 

The Brotherhood of the Black Crowes had a new mission for our young group of warriors.  Vizier Melkot, the master in charge of affairs of an arcane nature for the Crowes, needed us to escort one of his associates to a keep on the edge of the God King’s realm along the border with the wicked realm of Malithorn.  The Kingdom of Raegeleth on the island of Rhaghaera where the God King reins supreme had been in a near constant state of war with the forces of the Kingdom of Malithorn, part of which was also on the island.  Malithorn was ruled by their evil and most likely undead leader Ravishar the Undying.  For as long as anyone can remember the God King’s country and army has been at war with the minions of Malithorn.  Some of the combatants are humans of Volkyr or Thugee descent but a large percentage of his army is comprised of evil humanoids of various types sworn to serve him.  The last full blown war was merely three years ago, though most of the regular and more recent incursions have been on a much smaller scale.  These incursions usually consisted primarily of small scouting and raiding parties sent forth by both sides to test the strength and gather information about the enemy.  On both sides of the border there are arrayed a number of baronies and dukedoms granted by the two rulers to these petty Dukes and Barons for the sole purpose of guarding their border outposts against incursions by the forces from the other side.

One such border outpost was a rather large fortress or keep and a small town by the name of Orcwald.  Our orders were to escort one Rallemon of Illimus to the outpost and town of Orcwald safely, wait for him to conduct his business there, and then to escort him safely back to Caursetti.  Rallemon was an arcane spellcaster of some sort and he was known to have many enemies, particularly among the forces, assassins and spies of  Malithorn who would like to see him dead.  Therefore, Vizier Melkot explained, it was of the utmost importance that we escort him safely to and from the border outpost in order to protect him from his many enemies.  As we were leaving Caursetti, we had to travel through the Grimward district of town after leaving the Iron Keep of the Brotherhood within the city.  Grimward is a rough neighborhood in Caursetti adjacent to the dock districts.  As we were travelling past the many ships moored along the docks we couldn't help but notice that one of them was a Thugee privateer by the name of the Demon’s Echo and Captained by one Titus Blackwell.  The Demon’s echo was flying a black flag with a skull and flames that day as we walked past her mooring.  It is rumored that the ship and crew are of questionable origins and are thought to be pirates by the common folk.

As we were passing the area where the ship was moored, we were accosted by a rather large group of Thugee sailors that were most definitely crewmen of the Demon’s echo out looking for trouble.  We told them we didn’t want any trouble and tried to warn them off but they attacked us anyway in broad daylight!  We did our best to protect Rallemon, for it was pretty obvious that he was the one they were after, and a fierce battle ensued.  In the end it took a sleep spell to take down the remaining group of pirates that weren't killed in the struggle though several of our comrades were wounded as well.  So with this abortive attempt to leave the city disrupted, we returned to Iron Keep to seek healing for our wounded and to give the brotherhood our captive Thugee pirates to be ransomed back to their people for attacking us and causing an armed altercation in the city of Caursetti.  The proper authorities were also notified about the altercation of course.

So finally, we had all of that taken care of and left town post haste since it was getting late and the fight with the Thugee had delayed our departure.  When we arrived at a travelling Inn in a small hamlet along the way, the innkeeper tried to warn us away by saying he was closed, but we insisted that we were paying customers and soldiers in the service of the God King, and urgently needed accommodations so he let us in.  His mood was improved when we offered to pay him double his customary rates for a stay at the inn.  During the night, we heard a loud noise downstairs and Viktor the Thugee went down to investigate, sword in hand.  It appeared that we had been followed as more Thugee, probably from the ship, were asking to be let in to stay the night.  The Inkeeper was trying to tell them it was too late and they would have to wait until the next day but they were pretty persistent and wouldn't take no for an answer.  When they saw the large Thugee come down the stairs wielding his weapons and ready for battle, they thought better of the idea and left the inn post haste.  We never heard from or saw them again but our guess was these were the enemies of Ralleman that the Vizier had warned us about and were likely spies of Malithorn as well.  So we did our job and kept Rallemon safe.

After another day of journeying along the road, we finally arrived at Dungeon Module B2 the Keep On the Borderlands!  Once there, Rallemon went off to take care of his business and we started investigating our new environs at the keep and the small town of Orcwald.  We immediately went to the tavern and ordered drinks and accommodations and started hearing rumors of a series of Caves nearby called the Caves of Chaos from which no adventurers had ever returned!  This piqued our interest and then we heard another rumor that said “If you get lost, beware the eaters of men”!  This was followed by yet another rumor – “Beware the Mad Hermit!” and yet another rumor that “a magic wand was lost in the caves”.  We were very interested in the caves at this point since we had some time to kill while waiting for Rallemon to take care of his business, so we decided to buy some provisions and adventuring gear and seek out adventure and wealth at the Caves of Chaos!

We followed the well worn trails as best as we could from the descriptions we received from the bartender at the inn and soon enough we entered a box canyon with a multitude of caves at different altitudes all around the canyon.  So we decided to go into the first cave on the left and shortly after we entered, we were greeted by an avalanche of spears and javelins and heard shouts of “Bree Yark”.  This was followed by more shouts to the right of us from another passageway, and it was apparent that we were about to be attacked from two sides simultaneously.  To make matters worse, we heard something very large and angry coming from the direction of the goblins on the right hand side with the goblins urging it on and shouting words of encouragement.  We returned a volley of missiles after a number of our group had been hit and the spellcasters prepared to cast their sleep and color spray spells – but then the rest of the group thought that discretion was the better part of valor and withdrew from the tunnel leaving the wizards standing there all alone to take on the onrushing goblins!  Seeing their protection flee before them the wizards and the illusionist aborted their spell casting and fled as well to avoid being killed or captured by the goblins.

It was apparent that we made the right call to fall back especially with reinforcements coming from the other side to flank us and hem us in.  Had we tried to tough it out in that fight, we probably would have all died so in the end it was the right call.  We returned to the keep having located and ventured into the Caves of Chaos and boasted upon our return that we were the first adventurers to ever return alive from the Caves of Chaos!  Of course once back, we found out that that was really a jest and that plenty of adventurers had in fact returned with loot and stories of all of the evil humanoids that they had had to fight there, though a number of them had not returned.  Based on our recent experience, we were well aware of the dangers, having narrowly escaped the caves inhabitants to fight another day.

TO BE CONTINUED…

Tuesday, August 2, 2011

ICE Merp Layouts from the Palantir Quest and Minas Tirith Modules

The first ICE MERP 2nd Edition modules that I did artwork for starting in March of 1994 were the Palantir Quest adventure module and the city module for Minas Tirith.  I was just developing my drawing style at this point and the CAD drawings weren't as nice as the first hand drawn ones so I'm posting the hand drawings here now for this blog post.  I may post some of the CAD drawings from this module at a later date along with some of the other hand drawn illustrations that aren't shown here.  The coolest one of the bunch has to be the town of Larach Duhnnan map that I drew by hand for the Palantir Quest.  I remember spending a lot of time on this one and it shows (there's a lot of ink on the page).

The Town of Larach Duhnnan Map from ICE's MERP 2nd Edition module for the Palantir Quest

The next illustration is also from the Palantir Quest and depicts an architectural floor plan of the ruins of the Royal Library at Annuminas.  The ruined portions are represented by the dash-dot line hatch and the intact portions are represented as solid walls by the black poche (the solid black fill).  Again, there is no text on these pre-press layouts as it was added later for the area/room keys, the graphic scale, the north arrow and the legend which is typical of most of these scans.

Palantir Quest ruins of the Royal Library at Annuminas

The final drawing I'm posting here from the Palantir Quest is the Smuggler's Cave and Lake Town hideaway where some important clues for completing the quest are located.  Note the larger scale waterfront lake town location map at the top and the close up view of the Ruins and Smuggler's Cave below.

Palantir Quest Lake Town Smuggler's Cave and ruins with water front site plan

All of these layouts were drawn using ink on vellum which was my usual medium for the hand drawn illustrations that I did back then.  The next illustrations were done for the MERP Minas Tirith Module.  I did quite a few more city dwellings and other structures for that module but these were the two nicest ones of the bunch.

Minas Tirith Walled Manor House

The final layout in this series is an upscale dwelling with a pool on the first floor and elaborate rooftop gardens above the second floor accessed from the spiral staircase.  I did a number of other simpler dwellings for this module but none quite as elaborate or interesting as these two.

Minas Tirith upscale dwelling


Copyright notice:  All original artwork on this page is displayed for self promotion purposes only and is copyrighted by the original artist, Daniel Cruger.  This artwork may be downloaded and used for personal use only and may not be reproduced for commercial purposes in any way without the express written consent of the owner.


Sunday, April 10, 2011

ICE MERP Layouts from the Mirkwood Module

The illustrations below were drawn for ICE's Middle Earth Role Playing Second Edition book of Mirkwood in 1995.  I think this was the third book I did illustrations for and all of the illustrations shown here were drawn with ink on vellum using technical pens.  The black and white map of the southern half of the forest of Mirkwood was used to key locations found in the module.  Towns or villages are shown with three dots, towers are shown as spires and the locations with flags on them are fortresses.  This was the largest scale map I ever did for them.  I'm not sure why but there is no north arrow or graphic scale drawn on this illustration - they were probably added later by the ICE staff as was the rest of the text.

Map of Southern Mirkwood

The next map is the map of the ruins of Dale after it was destroyed by Smaug.  Note the location map in the upper right hand corner showing the Lonely Mountain.  That was drawn by referencing the map in the book "the Hobbit" that shows the Lonely Moutain.  I did another CAD map of Dale in better times when it wasn't a ruin but didn't show it here because it isn't as nice as this one.

Ruins of Dale Showing the Lonely Mountain

The next three drawings are of the Dwarven Halls of Erebor carved within the Lonely Moutain.  These were rendered to look like maps carved in stone in a similar style to the maps I did for Moria.  Note the dwarven runes.  Also note that on the first map, the river runs alongside the entry road as described in the book.

Erebor the Lonely Mountain First Delving

The next level is the Under Delving or Second Level where Smaug resided before and during the events described in the Hobbit.

Erebor the Lonely Mountain Under Delving

The next drawing is just a closeup of the previous one showing where Smaug resides.  It is the rectangular chamber roughly centered on the image below and was labeled as Room #47 in the module.

Erebor the Lonely Mountain Under Delving Chamber of Smaug

The final layout from the Lonely Mountain is the King's Delving of Erebor where the royal apartments of the King of Erebor are located.

Erebor the Lonely Mountain King's Delving


The next layout shows the plans of the tower of Sarn Goriwing.  The great black spire rises out of the center of the waterfall called Goriwing near the headwaters  of the enchanted river (S. Guildin).  Lachglin the Animist resides here.

Tower of Sarn Goriwing - Lachglin's Residence

The next layout is a plan of Rhosgobel, the enchanted home and refuge of Radagast the Brown.  It is located on the western edge of the narrows of Mirkwood and is a celebration of the the abundant forms of Endorian life.

Rhosgobel, the enchanted home of Radagast the Brown

The layout below is a plan layout of the Holy Carrock.  It is a large stone shrine sitting in the middle of the river that was hollowed out of a large natural rock formation.  It is a sacred site to the Beijabar who reside along the western edge of Mirkwood.  The manor house of the high shape changer of the Beijabar is also located nearby.

The Holy Carrock, a Sacred Beijabar Site

The following layout is of the hill fort of Ursh Lana also known as "the Defiant Hill".  It is the westernmost of the Asdraige Easterling outposts.

Ursh Lana or "Defiant Hill" - Easterling Hill Fort

The final layout of this series is of a typical outpost of Gondor, one of many built in the region.  They were primarily built and manned by the kingdom of Gondor in order to keep an eye on their Easterling neighbors.


Typical Outpost of Gondor

Copyright notice:  All original artwork on this page is displayed for self promotion purposes only and is copyrighted by the original artist, Daniel Cruger.  This artwork may be downloaded and used for personal use only and may not be reproduced for commercial purposes in any way without the express written consent of the owner.


Sunday, March 27, 2011

ICE MERP Illustrations from the Kin Strife Module

I drew a group of illustrations for ICE's Middle Earth Role Playing module for the Kin Strife back in 1995.  The Kin-strife presents the people, politics, and armies of Gondor under the repressive rule of Castamir the Usurper during the civil war of the Kin-strife in 1437 of the Third Age. The six largest cities of the South-kingdom - Pelargir, Umbar, Lond Ernil, Osgiliath, Minas Anor, and Minas Ithil - are described along with their administrative structures, military organization, and legal systems.
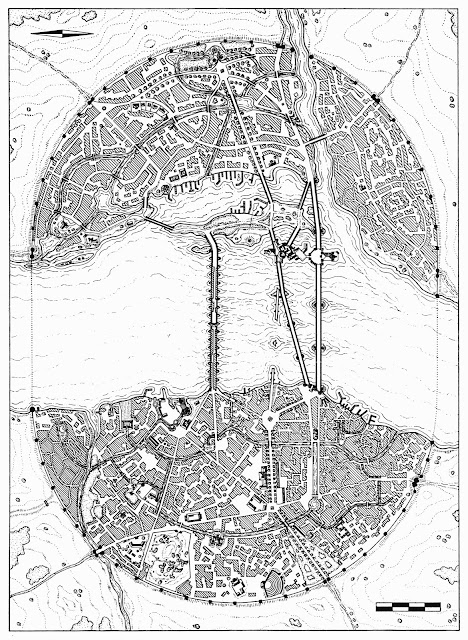
Map of the City of Osgiliath near Minas Tirith

The map of Osgiliath shown above was hand drawn on 11x17 vellum paper with technical pens and again, has no text because it is the pre-press version without the final page layout.  It was photographically shot down to fit on a single page for the module.  I was given a previous rendition of the map as a starting point that only had the lower half of the city shown and traced this to draw half of the map, including parts of the bridges.  I think that the map that half of this drawing was traced from was a color original and I created the other half in a similar style but in black and white.  This was fun because I got to design half of the city and some of its features like the street layout, the canals and some of the additional fortified manor houses.  The dotted lines in the river represent the chains used to keep enemy ships from entering the river that runs through the city.  This map also represents the city before it was later ruined in the civil war and conflicts with Sauron's forces even later.

Unfortunately, the original 11x17 drawing was lost when ICE closed its doors.  They gave me all of my original artwork at the time and I assumed it was in the package but when I went to look later all I found was an 11x17 copy and some 8 1/2 x 11 reductions which is what this scan was made from.  I may be able to track down a better quality scan but I have no idea who ended up with the original or if it even survives to this day.  It is my favorite of all of the city maps I did for them and I really wanted to frame the the original drawing but its gone at this point.  This scan is not that great of a quality because it is a scan of a photocopy reduction and is missing some of the fine lines of the river but is otherwise not too bad.  If I can obtain a better quality scan from some of the old crew or if the 11x17 copy I have is of better quality I may re-scan it and post a better quality image later.

The Tower Dome of Osgiliath Great Hall First Floor Plan

The Tower Dome of Osgiliath also known as the Dome of Stars was built on the bridge of Osgiliath after Gondor was founded in the year 3320 of the Second Age.  It was built to house one of the larger Palantir which was placed in the domed chamber of the stars at the top of the tower.  During the fighting of the Kin Strife when Osgiliath was captured by the rebel leader Castamir, the Dome of Stars was destroyed and the Stone of Osgiliath was lost in the waters of the Anduin river.  The front view of the tower can also be seen on the cover of the module (painted by another artist) right before it is about to fall into the river.

The layout above was drawn using AutoCAD and represents the lower great hall level below the tower itself.  The tower is situated above the throne room between the two square towers at the south end of the great hall and is accessed from the second floor and the stairway leading up to the door from the terrace level below.  You can see the complex on the large scale map of Osgiliath drawn on the bridge on the upper middle right hand side of the map.

The next two maps were drawn in a similar manner to the Osgiliath Map above but I used the original color maps for both cities from previous modules (which were both complete) to trace the black and white images onto the translucent vellum.  The first city is the city of Umbar, also known as the Gray Haven and Home of the Corsairs.

City of Umbar Map

The next map is of the City of Minas Ithil with its spiraling plan layout not unlike the layout of Minas Tirith.

City of Minas Ithil Map

The next layout shows the small shanty town that was built up outside of one of the gates as often happened in fortified medieval towns after their was no real estate left within the walls to build on.

Minas Ithil Shanty Town

The next layout is of the Sea Lord's Tower which is in the middle of the City of Pelargir.  This was drawn with AutoCAD as well.

The Sea Lord's Tower in the City of Pelargir

The final layout in this series of illustrations is a plan layout of Margalad's manor house in one of the cities in the module.  I'll post a better description when I have had a chance to take a look in the module.  My assumption is that Margalad is one of the nobles embroiled in the intrigue and struggle of the Kin Strife civil war.

First and Second Floor Plans for Margalad's manor house

These more formal building plans gave me a chance to draw upon my architectural design and history background for inspiration and I came up with all of the vaults, niches and cool plan features shown outside of the basic layout of the building provided to me by the writers.

For a brief background and introduction on my time working for ICE as a freelancer go here:
Game Art and ICE Illustration Background


Copyright notice:  All original artwork on this page is displayed for self promotion purposes only and is copyrighted by the original artist, Daniel Cruger.  This artwork may be downloaded and used for personal use only and may not be reproduced for commercial purposes in any way without the express written consent of the owner.

Friday, March 18, 2011

ICE MERP Towers from Dol Guldur Module

The tower layouts below were drawn for Iron Crown Enterprises for their Middle Earth Role Playing module of Dol Guldur back in 1995 using AutoCAD.  The mountain where the citadel is located is in southwestern Mirkwood and before Sauron's occupation it was called Amon Lanc or "Naked Hill".  After Sauron came to reside there, it became known as Dol Guldur or the "Hill of Sorcery".  Dol Guldur is first mentioned as "the dungeons of the Necromancer" in The Hobbit by J.R.R. Tolkien.

This module was written for ICE by author David Woolpy who provided me with preliminary layouts to base these drawings on.  The layouts shown here are pre-press layouts and are missing some of the descriptive text including drawings titles which was added later, although the room numbers, north arrow text, and graphic scale text is present.  If you want to see what the final layouts looked like you will have to refer to the module.

The layouts below only represent the outer fortifications of the massive citadel - there are a whole slew of levels some of which I may end up posting later but the towers are the coolest drawings of the bunch.  The fortress citadel is honeycombed with seven levels cut through the volcanic mountain, three precipice levels cut through the upper opening of the volcano itself at the top of the mountain and five stratum levels descending down into the earth below the first level.  The level numbers go up in ascending order (they increase in number the higher up you go) and the first level is accessed from the front gate below.  The stratum levels go down in number from the first level into the earth below and are also accessed from the front gate.

Dol Guldur - The Front Gate

The second level is home to two Kragor Lug watchtowers cleverly hollowed out from rock outcrops on the side of the mountain by the orc guards of Dol Guldur.

Dol Guldur - 2nd Level with Kragor Lug watch towers


There are many outer works and towers surrounding the mountain istelf some of which are connected to the citadel by underground passages.  Most of these towers are guarded by orc or goblin guards and were built in order to keep an eye on the approaches to the citadel.  The first of the outer works is the Smalug watch tower.  I think there are supposed to be several of these around the mountain but again you'll have to refer to the original module if you want more info on that.

Dol Guldur Smalug Watch Tower

The next watchtower type of the outer works is the Lugash.  These are very gothic looking with the buttresses and gargoyles perched atop the battlements and are my favorite of the bunch.  I actually drew the evilly smiling faces on the gargoyles if you zoom in real close to them in AutoCAD.  I'm not sure why I did this because you'll never see them in these layouts but I guess it was just a desire to fully detail the evil guardians or something.  I'll post a close up of the gargoyles later.

Dol Guldur Lugash Watchtower

The last of the watchtowers is the Lugdom which I think served as a fortified postern gate for the citadel (the back door).  Note the Cthuloid looking balcony support at the front of the upper tower.

Dol Guldur Lugdom Fortress


You've probably noticed that all of the towers have the word "Lug" in the name.  I can't say for sure but my guess is that this is the orcish word for "watch" as in watch tower.  This is the first of a series of blog posts that I plan to make in order to showcase the game art I did for ICE back in the day.  More to come...

For a brief background and introduction on my time working for ICE as a freelancer go here:
Game Art and ICE Illustration Background


Copyright notice:  All original artwork on this page is displayed for self promotion purposes only and is copyrighted by the original artist, Daniel Cruger.  This artwork may be downloaded and used for personal use only and may not be reproduced for commercial purposes in any way without the express written consent of the owner.